🏧 在 Solana 上铸造代币 - 成为你自己的央行行长!
🎯 项目目标
准备好创造你自己的魔法互联网货币了吗?今天我们要打开印钞机!💵
你将学会:
- 🏭 创建代币铸造厂
- 💳 创建代币账户
- 🖨️ 铸造你的代币
- 💸 转账和销毁代币
🌟 发挥创意的时刻
这是你创造历史的机会!你可以创建:
- 🍕 PizzaCoin - 因为披萨是永恒的
- 🥷 HokageCoin - 火影忍者粉丝专属
- 🐕 DogeCoin 2.0 - 因为一个狗币不够
- 💎 DiamondHands - 钻石手专用币
- 🚀 ToTheMoonCoin - 目标月球!
🚀 第一步:项目初始化
🎬 创建新项目
# 🏗️ 创建新的 Solana 客户端(替换 [name] 为你的代币名)
npx create-solana-client pizzacoin-minter --initialize-keypair

# 📁 进入项目目录
cd pizzacoin-minter

# 📦 安装依赖
npm install

# 🪙 安装 SPL Token 库
npm install @solana/spl-token
💡 --initialize-keypair 的魔法
这个标志自动为你:
- 生成新密钥对
- 保存到 .env 文件
- 空投测试 SOL
- 设置连接配置 一个命令搞定所有初始化!
🎨 测试运行
npm run start
你应该看到:
🔑 密钥对生成成功!
💰 空投 2 SOL 成功!
📍 你的地址: 7cVf...
 美联储主席鲍威尔:印钞机 goes brrrrr 🖨️💵
🏭 第二步:构建代币铸造器
📝 核心功能规划
🏗️ Step 1: 创建铸币账户
打开 src/index.ts,添加以下代码:
// 📦 导入必要的库
import * as token from "@solana/spl-token";
import * as web3 from "@solana/web3.js";

// 🏭 创建新的代币铸造厂
async function createNewMint(
    connection: web3.Connection,
    payer: web3.Keypair,
    mintAuthority: web3.PublicKey,
    freezeAuthority: web3.PublicKey,
    decimals: number
): Promise<web3.PublicKey> {

    console.log("🏭 创建代币铸造厂...");

    // 🎯 创建铸币账户
    const tokenMint = await token.createMint(
        connection,                // 网络连接
        payer,                     // 谁付钱
        mintAuthority,             // 谁能铸币
        freezeAuthority,           // 谁能冻结(null = 没人)
        decimals                   // 小数位数
    );

    console.log(`✅ 代币铸造账户创建成功!`);
    console.log(`🏭 铸币地址: ${tokenMint.toBase58()}`);
    console.log(
        `🔍 查看: https://explorer.solana.com/address/${tokenMint}?cluster=devnet`
    );

    return tokenMint;
}
🎯 关键参数解释
- mintAuthority: 控制谁能印钱(通常是你)
- freezeAuthority: 控制谁能冻结账户(可以是 null)
- decimals: 代币精度(2 = 像美分,9 = 像 SOL)
选择小数位数就像选择货币单位:
- 0 位:只有整数(1, 2, 3...)
- 2 位:像美元(1.00, 1.50...)
- 9 位:像 SOL(超精确)
💳 Step 2: 创建代币账户
// 💳 为钱包创建代币账户(像开银行账户)
async function createTokenAccount(
    connection: web3.Connection,
    payer: web3.Keypair,
    mint: web3.PublicKey,
    owner: web3.PublicKey
) {
    console.log("💳 创建代币账户...");

    // 🔍 获取或创建关联代币账户
    const tokenAccount = await token.getOrCreateAssociatedTokenAccount(
        connection,         // 网络连接
        payer,             // 谁付账户租金
        mint,              // 哪种代币
        owner              // 谁拥有这个账户
    );

    console.log(`✅ 代币账户创建成功!`);
    console.log(`📍 账户地址: ${tokenAccount.address.toBase58()}`);
    console.log(
        `🔍 查看: https://explorer.solana.com/address/${tokenAccount.address}?cluster=devnet`
    );

    return tokenAccount;
}
💡 智能提示
getOrCreateAssociatedTokenAccount 很聪明:
- 如果账户已存在 → 返回现有账户
- 如果账户不存在 → 创建新账户 这避免了重复创建的错误!
🖨️ Step 3: 铸造代币
// 🖨️ 开动印钞机!
async function mintTokens(
    connection: web3.Connection,
    payer: web3.Keypair,
    mint: web3.PublicKey,
    destination: web3.PublicKey,
    authority: web3.Keypair,
    amount: number
) {
    console.log(`🖨️ 开始铸造 ${amount} 个代币...`);

    // 📊 获取代币信息
    const mintInfo = await token.getMint(connection, mint);

    // 💵 铸造代币
    const transactionSignature = await token.mintTo(
        connection,
        payer,
        mint,
        destination,
        authority,
        amount * 10 ** mintInfo.decimals  // 转换为最小单位
    );

    console.log(`✅ 成功铸造 ${amount} 个代币!`);
    console.log(
        `🔍 交易: https://explorer.solana.com/tx/${transactionSignature}?cluster=devnet`
    );

    return transactionSignature;
}
🎮 第三步:组装主函数
async function main() {
    console.log("🚀 启动代币铸造程序...\n");

    // 🌐 连接到 Devnet
    const connection = new web3.Connection(web3.clusterApiUrl("devnet"));

    // 🔑 初始化密钥对
    const user = await initializeKeypair(connection);
    console.log("👤 铸币厂长地址:", user.publicKey.toBase58());
    console.log("=" .repeat(50));

    // 🏭 Step 1: 创建代币铸造厂
    console.log("\n📌 Step 1: 创建代币铸造厂");
    const mint = await createNewMint(
        connection,
        user,               // 我们付钱
        user.publicKey,     // 我们是铸币权威 👑
        user.publicKey,     // 我们也是冻结权威 ❄️
        2                   // 2位小数(像美分)
    );

    // 💳 Step 2: 创建代币账户
    console.log("\n📌 Step 2: 创建代币账户");
    const tokenAccount = await createTokenAccount(
        connection,
        user,
        mint,
        user.publicKey      // 给自己创建账户
    );

    // 🖨️ Step 3: 铸造 100 个代币
    console.log("\n📌 Step 3: 铸造代币");
    await mintTokens(
        connection,
        user,
        mint,
        tokenAccount.address,
        user,
        100  // 铸造 100 个代币
    );

    console.log("\n🎉 恭喜!你的代币帝国建立成功!");
    console.log("💰 当前余额: 100 个代币");
    console.log("🏭 铸币地址:", mint.toBase58());
    console.log("💳 账户地址:", tokenAccount.address.toBase58());
}
运行程序:
npm run start
💸 第四步:转账和销毁功能
📤 转账代币
// 💸 转账代币给其他人
async function transferTokens(
    connection: web3.Connection,
    payer: web3.Keypair,
    source: web3.PublicKey,
    destination: web3.PublicKey,
    owner: web3.PublicKey,
    amount: number,
    mint: web3.PublicKey
) {
    console.log(`💸 转账 ${amount} 个代币...`);

    // 📊 获取代币信息
    const mintInfo = await token.getMint(connection, mint);

    // 💰 执行转账
    const transactionSignature = await token.transfer(
        connection,
        payer,
        source,                             // 从哪转
        destination,                        // 转到哪
        owner,                             // 授权人
        amount * 10 ** mintInfo.decimals  // 数量
    );

    console.log(`✅ 成功转账 ${amount} 个代币!`);
    console.log(`📤 从: ${source.toBase58().substring(0, 8)}...`);
    console.log(`📥 到: ${destination.toBase58().substring(0, 8)}...`);
    console.log(
        `🔍 交易: https://explorer.solana.com/tx/${transactionSignature}?cluster=devnet`
    );
}
🔥 销毁代币
// 🔥 销毁代币(减少供应量)
async function burnTokens(
    connection: web3.Connection,
    payer: web3.Keypair,
    account: web3.PublicKey,
    mint: web3.PublicKey,
    owner: web3.Keypair,
    amount: number
) {
    console.log(`🔥 销毁 ${amount} 个代币...`);

    const mintInfo = await token.getMint(connection, mint);

    const transactionSignature = await token.burn(
        connection,
        payer,
        account,                           // 从哪个账户销毁
        mint,                              // 哪种代币
        owner,                             // 账户所有者
        amount * 10 ** mintInfo.decimals  // 数量
    );

    console.log(`✅ 成功销毁 ${amount} 个代币!`);
    console.log(`🔥 总供应量减少: ${amount}`);
    console.log(
        `🔍 交易: https://explorer.solana.com/tx/${transactionSignature}?cluster=devnet`
    );
}
🎮 第五步:完整演示
async function fullDemo() {
    console.log("🎪 完整代币演示开始!\n");

    // ... 前面的初始化代码 ...

    // 🎯 创建接收者
    console.log("\n📌 Step 4: 创建接收者账户");
    const receiver = web3.Keypair.generate();
    console.log("👤 接收者地址:", receiver.publicKey.toBase58());

    const receiverTokenAccount = await createTokenAccount(
        connection,
        user,                  // 我们付钱创建
        mint,
        receiver.publicKey    // 但归接收者所有
    );

    // 💸 转账 50 个代币
    console.log("\n📌 Step 5: 转账代币");
    await transferTokens(
        connection,
        user,
        tokenAccount.address,
        receiverTokenAccount.address,
        user.publicKey,
        50,
        mint
    );

    // 🔥 销毁 25 个代币
    console.log("\n📌 Step 6: 销毁代币");
    await burnTokens(
        connection,
        user,
        tokenAccount.address,
        mint,
        user,
        25
    );

    // 📊 显示最终余额
    console.log("\n📊 最终统计:");
    console.log("💰 你的余额: 25 个代币(100 - 50 - 25)");
    console.log("💰 接收者余额: 50 个代币");
    console.log("🔥 已销毁: 25 个代币");
    console.log("📈 流通总量: 75 个代币");
}
🎨 在钱包中查看代币
运行程序后,你可能会在钱包中看到:
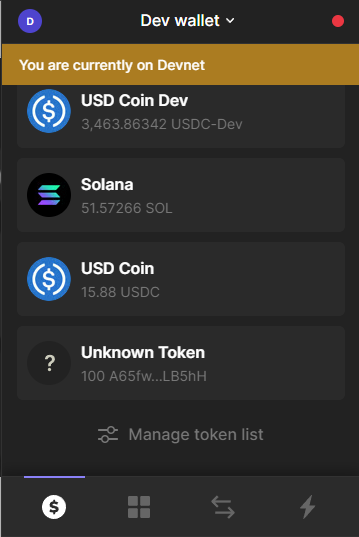
😱 显示"未知代币"?别担心,这是正常的!
🏷️ 为什么显示未知?
新代币 = 没有元数据
没有元数据 = 钱包不知道怎么显示
结果 = "Unknown Token" 😅
💡 解决方案
下一节我们将学习如何添加:
- 📝 代币名称
- 🖼️ 代币图标
- 💬 代币符号
- 📄 代币描述
🏆 挑战任务
🎯 Level 1: 创建你的 Meme 币
创建一个有趣的 meme 币,铸造 69,420,000 个!
🎯 Level 2: 空投系统
创建一个函数,向 10 个地址空投代币
🎯 Level 3: 通缩机制
实现每次转账自动销毁 1% 的机制
📚 技巧和最佳实践
⚠️ 常见错误和解决方案
| 问题 | 原因 | 解决方案 |
|---|---|---|
| "账户不存在" | 未创建代币账户 | 先调用 createTokenAccount |
| "余额不足" | 代币不够 | 检查余额或铸造更多 |
| "权限错误" | 不是铸币权威 | 使用正确的密钥对 |
| "小数位错误" | 计算错误 | 记得乘以 10^decimals |
💡 Pro Tips
// 🎯 Tip 1: 批量创建账户
const accounts = await Promise.all(
    addresses.map(addr =>
        createTokenAccount(connection, payer, mint, addr)
    )
);

// 🎯 Tip 2: 检查余额
const balance = await connection.getTokenAccountBalance(
    tokenAccount.address
);
console.log("余额:", balance.value.uiAmount);

// 🎯 Tip 3: 获取所有持有者
const holders = await connection.getProgramAccounts(
    token.TOKEN_PROGRAM_ID,
    {
        filters: [
            { dataSize: 165 },
            { memcmp: { offset: 0, bytes: mint.toBase58() }}
        ]
    }
);
🎊 恭喜完成!
你已经成功成为代币发行者!
✅ 你掌握了什么
- 🏭 创建铸币账户 - 你的代币工厂
- 💳 管理代币账户 - 用户的钱包
- 🖨️ 铸造代币 - 创造价值
- 💸 转账功能 - 流通货币
- 🔥 销毁机制 - 控制供应
🚀 下一步
- 添加元数据 - 让代币有名字和图标
- 创建 DApp - 用户界面
- 实现 Staking - 质押奖励
- 上线主网 - 真正的发行!
准备好成为下一个加密货币大亨了吗? 💎🙌 To the Moon! 🚀