📡 反序列化 - 解读链上数据的艺术!
🎯 学习目标
上一节我们学会了写入数据,现在要学习读取数据了!就像学会写信后,也要学会读信 📮
你将掌握:
- 🔑 深入理解 PDA(程序派生地址)
- 📖 从链上读取自定义数据
- 🔄 反序列化字节数据
- 🎬 显示所有电影评论
🌟 为什么反序列化很重要?
写入数据 = 发送信息 📤 读取数据 = 接收信息 📥 两者结合 = 完整的通信! 🔄
🗝️ 第一章:理解 PDA - Solana 的魔法地址
🎭 什么是 PDA?
让我们用一个生动的比喻理解 PDA:
🏦 传统账户(像个人银行账户)
├── 📮 公钥(账号)
├── 🔑 私钥(密码)
└── 💰 可以自主控制
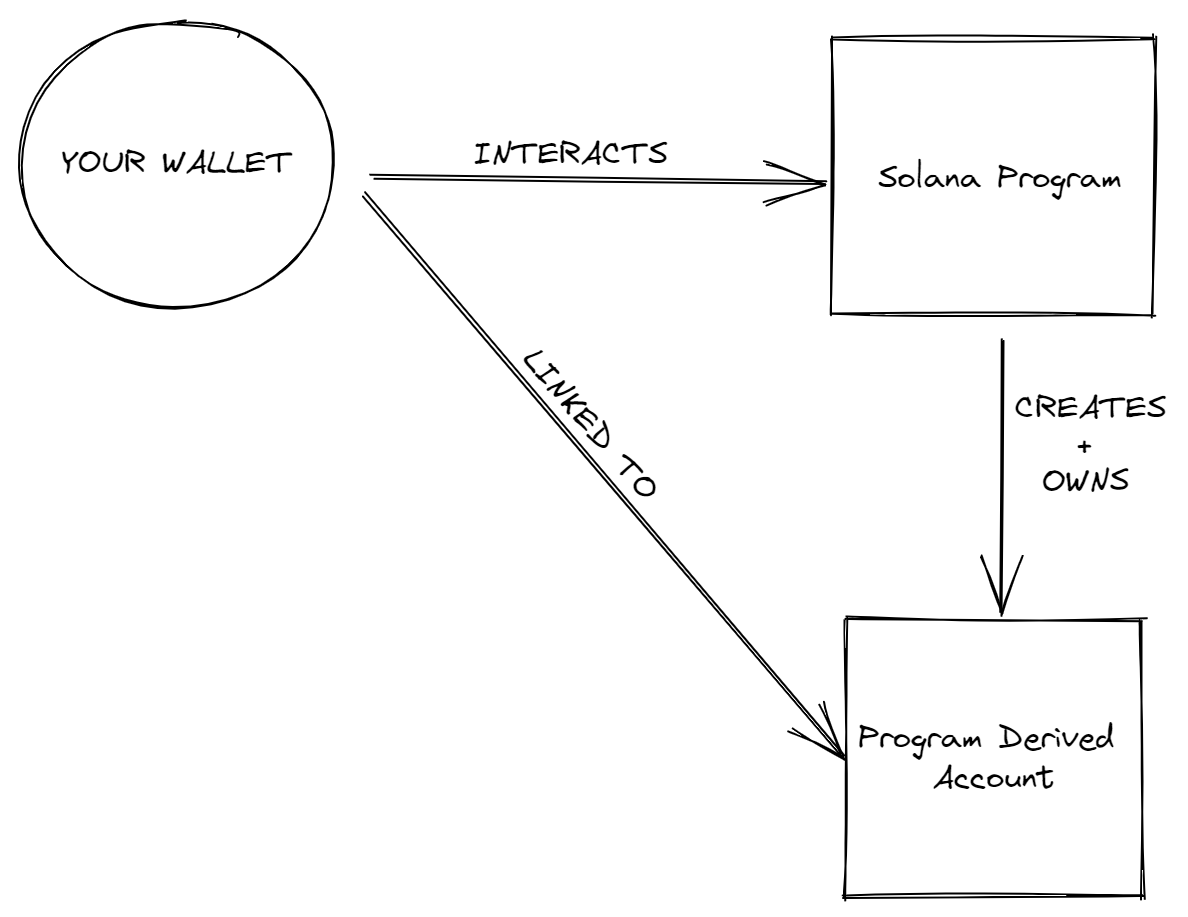
🎯 PDA(像公司保险箱)
├── 📮 地址(保险箱编号)
├── ❌ 没有私钥(没有钥匙)
└── 🤖 只能由程序控制(只有程序能打开)
💡 PDA 的独特之处
PDA = Program Derived Address(程序派生地址)
它们是"假账户":
- ✅ 有地址,可以存储数据
- ❌ 没有私钥,不能签名
- 🤖 完全由创建它的程序控制
- 🔒 极其安全(没人能偷走控制权)
🎲 PDA 的生成机制
// 🎯 PDA 生成的魔法公式
const [pda, bump] = await PublicKey.findProgramAddress(
    seeds,      // 🌱 种子(输入)
    programId   // 🏭 程序 ID
);

// 神奇的地方:相同的输入总是得到相同的输出!
📊 Ed25519 曲线的秘密
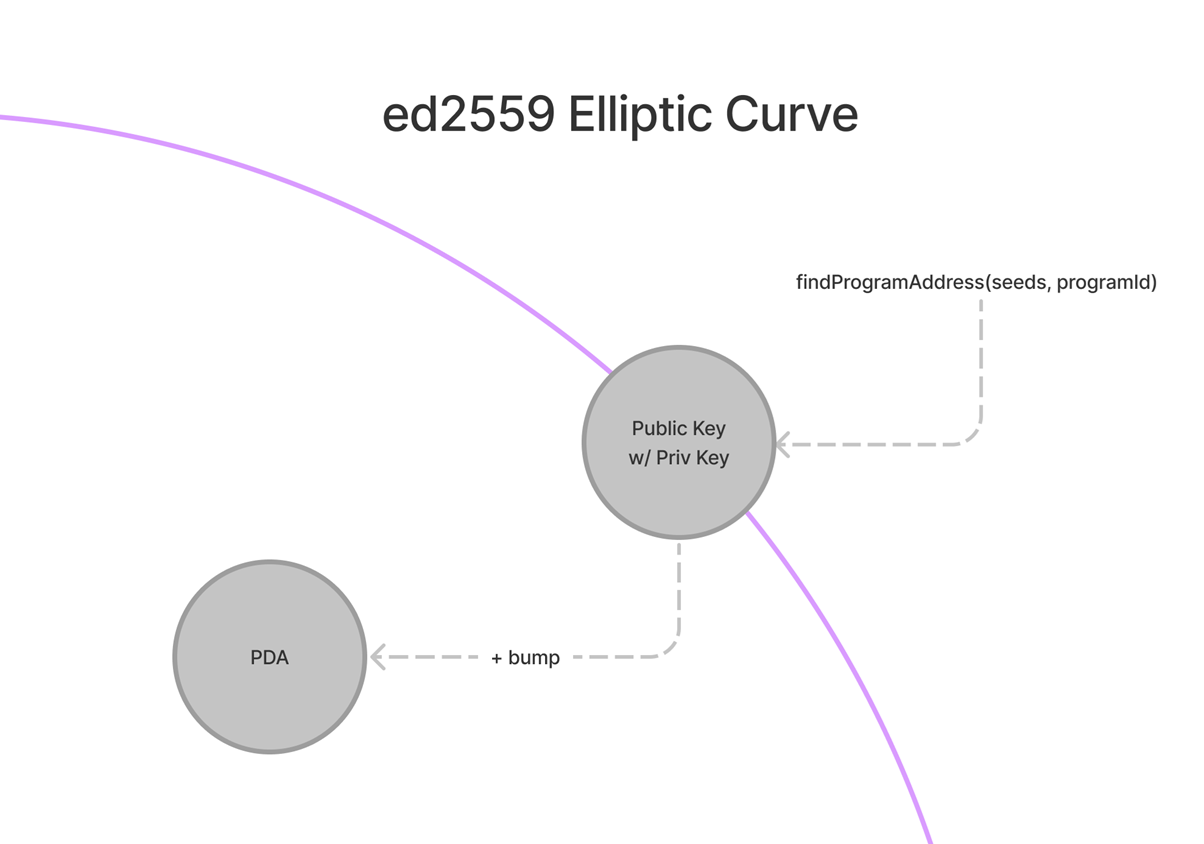
普通地址:在曲线上 ✅ → 有私钥 🔑
PDA 地址:不在曲线上 ❌ → 没有私钥 🚫

如果生成的地址碰巧在曲线上怎么办?
加个 bump!把它"撞"出曲线 💥
🎯 关键理解
你不需要成为密码学专家!只需记住:
- PDA = 没有私钥的特殊地址
- 由程序完全控制
- 用于安全存储数据
🗃️ PDA 作为数据库
PDA 就像 Solana 的键值数据库:
// 🌍 全局状态示例(一个程序一个)
const [globalPda] = await PublicKey.findProgramAddress(
    [Buffer.from("GLOBAL_STATE")],  // 固定种子
    programId
);

// 👤 用户特定数据(每个用户一个)
const [userPda] = await PublicKey.findProgramAddress(
    [userPublicKey.toBuffer()],     // 用户地址作为种子
    programId
);

// 📝 用户笔记系统(用户+标题的组合)
const [notePda] = await PublicKey.findProgramAddress(
    [
        userPublicKey.toBuffer(),
        Buffer.from("My First Note")  // 笔记标题
    ],
    programId
);
🔄 第二章:反序列化 - 解码的艺术
📖 什么是反序列化?
反序列化就像解密摩斯电码 📡:
链上数据(字节):[01001000 01101001 00100001]
        ↓ 反序列化
应用数据(对象):{ message: "Hi!" }
🎨 反序列化流程图
🏗️ 账户数据结构回顾
// 🎯 Solana 账户的标准结构
interface AccountInfo {
    lamports: number;      // 💰 余额
    owner: PublicKey;      // 👤 所有者程序
    executable: boolean;   // 🎮 是否可执行
    data: Buffer;         // 📦 原始数据(我们要解码的)
    rentEpoch: number;    // 📅 租金周期
}
💻 第三章:构建反序列化器
🚀 项目设置
# 选项 1:继续上一节的项目(推荐)
cd solana-movie-frontend

# 选项 2:克隆完成的版本
git clone https://github.com/all-in-one-solana/solana-movie-frontend.git
cd solana-movie-frontend
git checkout solution-serialize-instruction-data
npm install
🎬 更新 Movie 模型
打开 models/Movie.ts,添加反序列化功能:
// 📁 models/Movie.ts

import * as borsh from '@project-serum/borsh'

export class Movie {
    title: string;
    rating: number;
    description: string;

    constructor(title: string, rating: number, description: string) {
        this.title = title;
        this.rating = rating;
        this.description = description;
    }

    // 🗺️ 账户数据的模式(注意顺序!)
    static borshAccountSchema = borsh.struct([
        borsh.bool('initialized'),    // 是否已初始化
        borsh.u8('rating'),           // 评分(1-5)
        borsh.str('title'),           // 电影标题
        borsh.str('description'),     // 评论内容
    ])

    // 🔄 反序列化方法 - 字节变对象的魔法!
    static deserialize(buffer?: Buffer): Movie | null {
        // 🔍 Step 1: 检查是否有数据
        if (!buffer) {
            console.log('⚠️ 没有数据可以反序列化');
            return null;
        }

        try {
            // 📦 Step 2: 使用 Borsh 解码
            console.log('🔄 开始反序列化...');
            console.log('📊 数据大小:', buffer.length, '字节');

            const decodedData = this.borshAccountSchema.decode(buffer);
            console.log('✅ 解码成功:', decodedData);

            // 🎬 Step 3: 创建 Movie 对象
            const { title, rating, description } = decodedData;

            // 验证数据
            if (!title || rating === undefined || !description) {
                console.log('⚠️ 数据不完整');
                return null;
            }

            const movie = new Movie(title, rating, description);
            console.log('🎬 创建电影对象:', movie);

            return movie;

        } catch (error) {
            // ❌ 解码失败(可能不是电影数据)
            console.log('❌ 反序列化错误:', error);
            return null;
        }
    }

    // 🎨 用于显示的辅助方法
    getStars(): string {
        return '⭐'.repeat(this.rating);
    }

    getSummary(): string {
        return this.description.length > 100
            ? this.description.substring(0, 100) + '...'
            : this.description;
    }
}
📋 创建 MovieList 组件
更新 components/MovieList.tsx,从链上获取所有电影:
// 📁 components/MovieList.tsx

import { Card } from './Card'
import { FC, useEffect, useState } from 'react'
import { Movie } from '../models/Movie'
import * as web3 from '@solana/web3.js'
import { useConnection } from '@solana/wallet-adapter-react'

// 🎬 电影评论程序 ID
const MOVIE_REVIEW_PROGRAM_ID = 'CenYq6bDRB7p73EjsPEpiYN7uveyPUTdXkDkgUduboaN'

export const MovieList: FC = () => {
    // 🔗 获取连接
    const { connection } = useConnection();

    // 🎬 状态:存储电影列表
    const [movies, setMovies] = useState<Movie[]>([]);
    const [loading, setLoading] = useState(true);
    const [error, setError] = useState<string | null>(null);

    useEffect(() => {
        loadMovies();
    }, []);

    // 🚀 加载所有电影评论
    const loadMovies = async () => {
        try {
            setLoading(true);
            setError(null);
            console.log('🔍 开始加载电影评论...');

            // 📡 Step 1: 获取程序的所有账户
            const programId = new web3.PublicKey(MOVIE_REVIEW_PROGRAM_ID);
            console.log('📍 程序 ID:', programId.toBase58());

            const accounts = await connection.getProgramAccounts(programId, {
                // 可选:添加过滤器以优化性能
                dataSlice: {
                    offset: 0,
                    length: 1000  // 只获取前 1000 字节
                }
            });

            console.log(`📊 找到 ${accounts.length} 个账户`);

            // 🔄 Step 2: 反序列化每个账户
            const movieList: Movie[] = [];

            for (const { pubkey, account } of accounts) {
                console.log(`\n🔍 处理账户: ${pubkey.toBase58()}`);

                // 尝试反序列化
                const movie = Movie.deserialize(account.data);

                if (movie) {
                    console.log(`✅ 成功解析: ${movie.title}`);
                    movieList.push(movie);
                } else {
                    console.log(`⏭️ 跳过账户(非电影数据)`);
                }
            }

            // 🎨 Step 3: 排序(评分高的在前)
            movieList.sort((a, b) => b.rating - a.rating);

            console.log(`\n🎬 总共加载了 ${movieList.length} 个电影评论`);
            setMovies(movieList);

        } catch (err) {
            console.error('❌ 加载失败:', err);
            setError('加载电影评论失败,请刷新重试');
        } finally {
            setLoading(false);
        }
    };

    // 🎨 渲染 UI
    if (loading) {
        return (
            <div className="loading-container">
                <h2>⏳ 正在加载电影评论...</h2>
                <div className="spinner">🎬</div>
            </div>
        );
    }

    if (error) {
        return (
            <div className="error-container">
                <h2>❌ 出错了</h2>
                <p>{error}</p>
                <button onClick={loadMovies}>🔄 重试</button>
            </div>
        );
    }

    if (movies.length === 0) {
        return (
            <div className="empty-container">
                <h2>📭 还没有电影评论</h2>
                <p>成为第一个评论者吧!</p>
            </div>
        );
    }

    return (
        <div className="movie-grid">
            <h2>🎬 所有电影评论 ({movies.length})</h2>
            <div className="movies-container">
                {movies.map((movie, index) => (
                    <Card key={index} movie={movie} />
                ))}
            </div>
        </div>
    );
};
🎨 理解 reduce 方法(高级版本)
如果你想使用更函数式的方法:
// 🎯 使用 reduce 的优雅版本
const movies: Movie[] = accounts.reduce(
    (accumulator: Movie[], { pubkey, account }) => {
        // 尝试反序列化
        const movie = Movie.deserialize(account.data);

        // 如果成功,添加到数组
        return movie
            ? [...accumulator, movie]
            : accumulator;
    },
    []  // 初始值:空数组
);
🔍 优化:使用过滤器
对于生产环境,使用过滤器提高性能:
// 🚀 只获取已初始化的账户
const accounts = await connection.getProgramAccounts(programId, {
    filters: [
        {
            memcmp: {
                offset: 0,     // 检查第一个字节
                bytes: '2'     // 2 = true (已初始化)
            }
        }
    ]
});
🧪 第四章:测试你的应用
🎮 完整测试流程
# 1️⃣ 启动应用
npm run dev

# 2️⃣ 访问
http://localhost:3000

# 3️⃣ 你应该看到:
# - 之前提交的所有评论
# - 按评分排序
# - 完整的电影信息
🔍 调试技巧
// 🐛 添加详细日志
console.group('🎬 电影数据');
console.log('标题:', movie.title);
console.log('评分:', movie.rating);
console.log('描述:', movie.description.substring(0, 50) + '...');
console.groupEnd();
🏆 挑战任务:Student Intros 反序列化
🎯 任务目标
完成 Student Intros 应用的读取功能!
程序地址:HdE95RSVsdb315jfJtaykXhXY478h53X6okDupVfY9yf
📊 数据结构
// Student 账户数据结构
{
    initialized: boolean;  // 是否初始化
    name: string;         // 学生姓名
    message: string;      // 介绍信息
}
💡 实现步骤
Step 1: 创建 StudentIntro 模型
// 📁 models/StudentIntro.ts

export class StudentIntro {
    name: string;
    message: string;

    static borshAccountSchema = borsh.struct([
        borsh.bool('initialized'),
        borsh.str('name'),
        borsh.str('message'),
    ]);

    static deserialize(buffer?: Buffer): StudentIntro | null {
        // 实现反序列化逻辑
    }
}
Step 2: 创建列表组件
// 📁 components/StudentIntroList.tsx

const loadStudentIntros = async () => {
    const accounts = await connection.getProgramAccounts(programId);
    // 反序列化并显示
};
🏅 成功标准
- ✅ 显示所有学生介绍
- ✅ 正确反序列化数据
- ✅ 优雅的错误处理
- ✅ 加载状态显示
📚 深入理解
🎯 getProgramAccounts 的注意事项
⚠️ 性能警告
getProgramAccounts 是重量级操作!
- 可能返回大量数据
- 消耗大量 RPC 资源
- 在生产环境谨慎使用
最佳实践:
- 使用过滤器限制结果
- 实现分页
- 考虑使用索引服务
🔍 反序列化失败的常见原因
| 问题 | 原因 | 解决方案 |
|---|---|---|
| "无效的字节" | 模式不匹配 | 检查字段顺序 |
| "缓冲区太短" | 数据不完整 | 验证数据完整性 |
| "未知账户" | 非目标数据 | 添加类型检查 |
🎊 恭喜完成!
你已经掌握了完整的数据循环:
✅ 写入数据 - 序列化并发送 ✅ 存储位置 - 理解 PDA ✅ 读取数据 - 获取并反序列化 ✅ 展示数据 - 在 UI 中显示
🚀 你的技能树
之前:只能发送简单交易 😅
现在:可以构建完整的读写应用!🚀

从单向通信 → 双向数据流!
下一步:学习更高级的 Solana 开发模式! 🎯